If you’re running your site on a SuiteCommerce theme, you can create your skins and edit styles yourself in SMT (Site Management Tools). Here’s a quick guide on how to do it.
Our Innovations and Product team, led by our Design Tech Lead Marisa Garcia, is continuously updating and improving the themes created here at Tavano Team. Now, all of our themes are up to date to SuiteCommerce versions 2019.2 or later.
If you’re not familiar with our themes, check them out!
Our themes are compatible with NetSuite’s Theme Skins Manager (now called Theme Customizer. As a result, now you can make simple aesthetic changes yourself from SMT without a single line of code. Let’s get started, shall we?
How to Edit Styles in SMT | SuiteCommerce Themes
First of all, log in with your NetSuite account, enter the SMT and then go to the Theme Skin Manager. Click on Settings and then Themes.
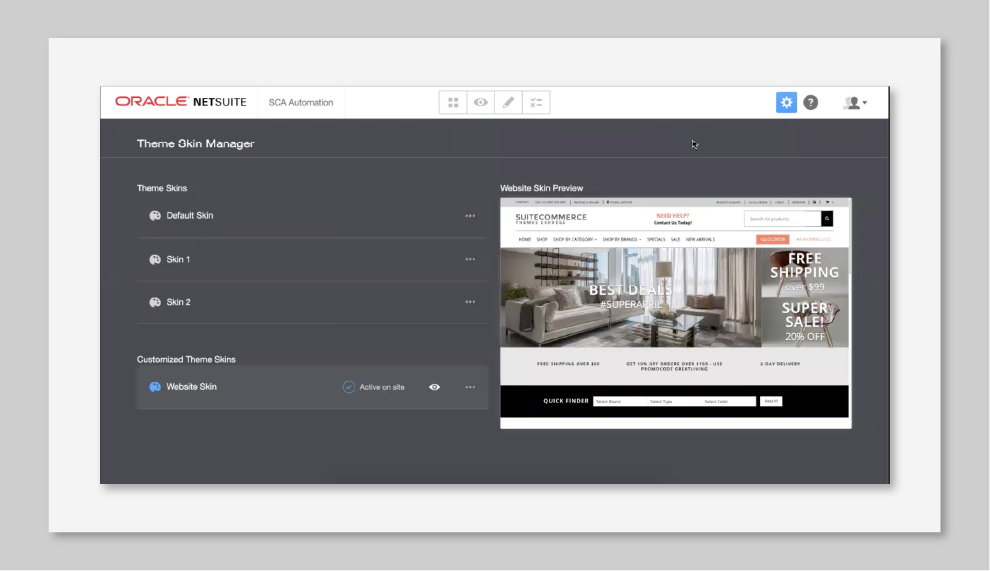
Here you will be able to edit your skins and change styles like colors, sizes, font family, buttons, and so on. You will see your default skins and the custom skins added by code (Skin 1 and Skin 2 in this example). But I’ll get into the code later.

If you want to customize or activate a skin, you’ll have to make a copy of an existing one. Please note that the option to edit the skin is only available in Aconcagua or later versions. The option to copy a skin became available with the 2019.2 version.
Once you have your skin copied, you can customize it. Click on Edit, and you’ll see that there are a lot of variables you can change. For example, the group Theme Palette will show you options to change all the colors from the primary color to the color of minor details in your theme.
Here you can play editing all of the variables that you want. The process is straightforward and intuitive, so it will be effortless for you to try new combinations, experiment with colors, fonts, and contrasts until you find one that you like. You can also set light or dark versions for your theme, among many other settings.
The Typography group will let you edit font sizes, font families, colors, and any other detail you could think of that relates to typography. For the sake of this demo, I changed Heading 1 color to red.

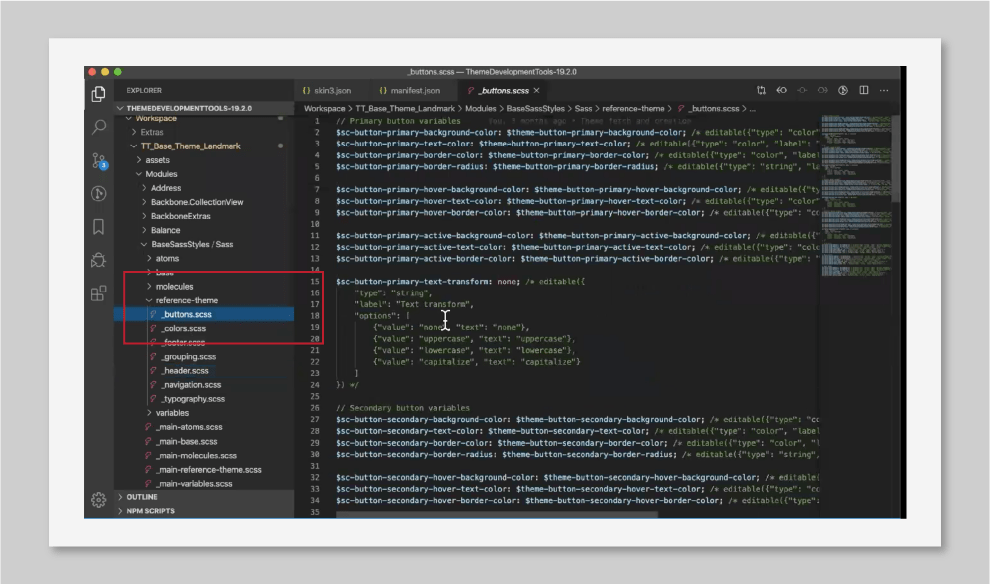
There’s also the buttons section, where you’ll be able to edit details such as size, padding, height, or spacing. Again, just for the sake of this demo, I will set the primary button color to light blue and the text color to red.
The Element Layout section will allow you to edit the header, navigation, and footer details. You’ll see in the demo below that I edited the header background, links, borders, and search box, all in just a few seconds!
You can now assign a name to your new skin and save it. For the last step, you’ll have to activate it. To do so, go to:
Customized Theme Skins > Set to Active > Confirm
This process will only take a couple of minutes, after which you’ll have your brand new skin.
How to Edit Styles in Code | SuiteCommerce Themes
If you prefer to manage your changes in skins and variables directly from the code, here’s how you’ll do it.
Workspace > Theme > Skins
Here you will see the skins and all the variables affected by this skin, where you can edit them directly in the code.
You can also add new skins by duplicating an existing skin – a simple copy/paste will do. To help the SMT find and load the new skin, you have to include it in the skin section of the manifest files. Please copy and paste it here and assign a name to your new skin.
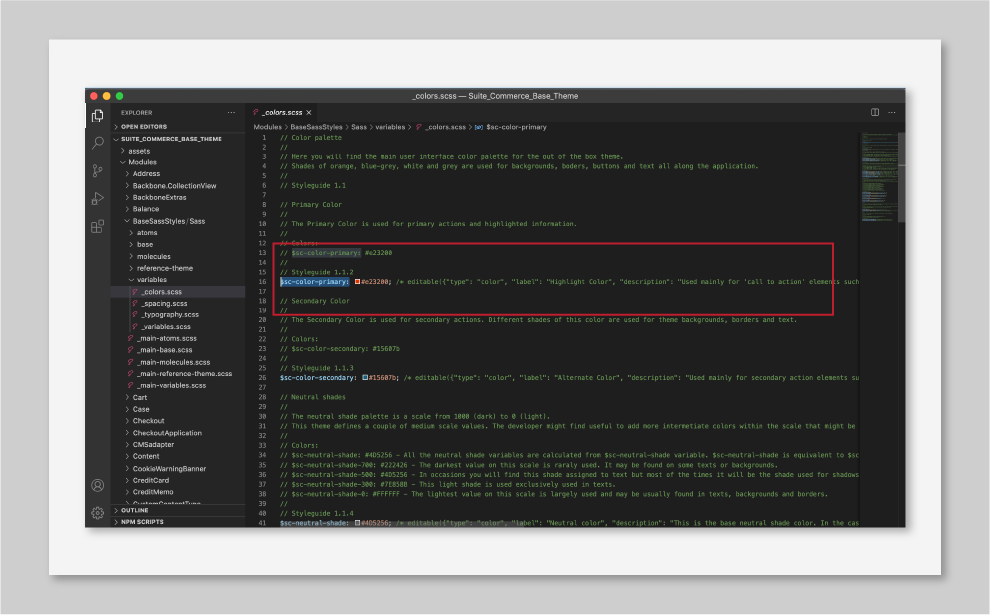
Another thing I’d like to show you is how to customize variables and groups that appear in the SMT when you edit the skin. So let’s find an editable variable, for example, the main color variables. Go to:
Modules > BaseSassStyles/Sass > variables > _colors.scss
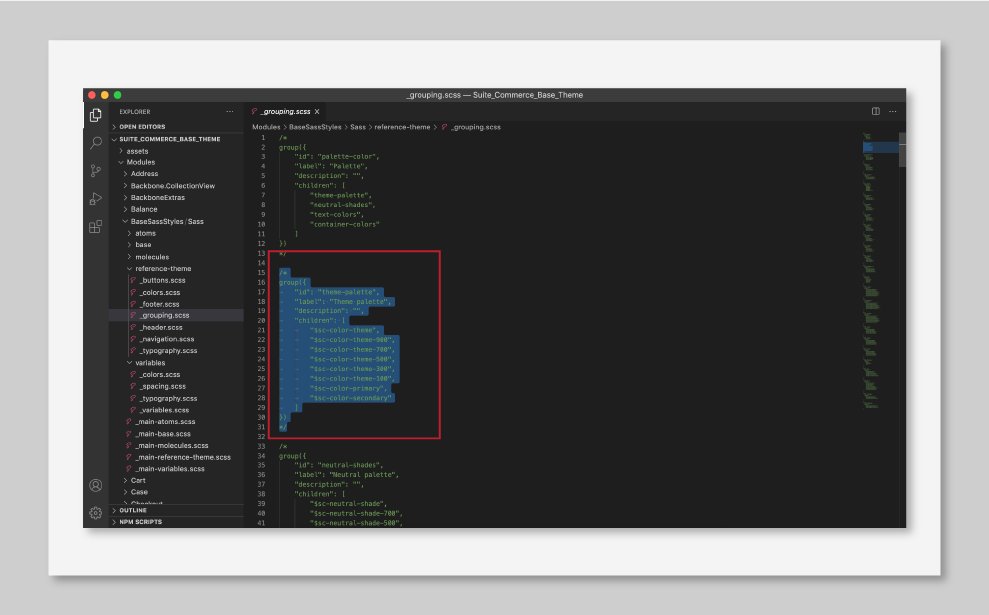
Let’s see how to edit the groups or add a variable to a group for the SMT. First, find the file that contains the group data. Here is where you can edit groups. Go to:
Modules > BaseSassStyles/Sass > reference-theme > _grouping.scss

Let’s take, for example, the Theme Palette group, which contains other smaller groups.
After changing and editing the variables, you’ll have to run the code and activate the theme in the NetSuite backend. Again, this process can take a couple of minutes. Make sure to double-check that everything is looking as you wanted.
If you need to make adjustments or further changes in the future, now you know how to do it yourself!
If you need help or want more details on creating skins or edit styles in CMS on a SuiteCommerce theme, send us a message and schedule a call with our team of experts!
Landmark theme
This demo used our SuiteCommerce Advanced Landmark theme. Watch the video below to see it in action and to discover all of its built-in features. Click here to talk to a consultant and get started!
Don’t forget to check out our NetSuite eCommerce services too: